Development Setup
This section describes how someone wanting to contribute to the libCellML project should set up their working copy for developing libCellML.
Contents
Overview
The libCellML codebase is hosted on GitHub and therefore Git is used to track changes. Before you begin, you will need to have a few pre-requisites satisfied:
Pre-requisite acquisition
In this section, we cover the retrieval and installation of pre-requisites.
Git
Creating a GitHub user account is straightforward and can be done here. Installing a Git client is particular to each operating system and some pointers are offered below:
We commonly use Git for windows, but other popular Git implementations are:
CMake
CMake is the cross-platform family of tools designed to build, test and package software. CMake is used to control the software compilation process using simple platform and compiler independent configuration files, and to generate native makefiles and workspaces that can be used in the compiler environment of your choice.
Again, installation of CMake is particular to each operating system.
For Ubuntu (and other Linux distributions), CMake can be installed using the package manager with the command sudo apt-get install cmake.
For Windows and macOS, CMake provides installation binaries.
Choose the binary appropriate for your operating system and follow the installation instructions.
Toolchain
The toolchain specifies the compiler that we will use to build libCellML. Toolchains are highly dependent on the operating system. When we test libCellML, we currently use Visual Studio on Windows, GCC on Ubuntu, and Clang on macOS. We recommend using these compilers on these systems, but feel free to use a different toolchain. We sometimes use the Intel C++ compiler to build libCellML, but we do not (at the time of writing) test with it.
The following sub-sections provide guidance on how to install the recommended toolchain on the major operating systems that libCellML supports.
Windows
Visual Studio is available to download from here. We currently test with Visual Studio 2015 (version 14), but later versions are known to work. The Community edition is more than sufficient for the needs of libCellML. To minimize the size of the installation, you may install only the C++ compiler. This component (and its requirements) is sufficient for building libCellML.
LibXml2
LibXml2 is already installed on macOS, so no further action is required on that platform.
On Windows, we must install LibXml2 using the recommended implementation available from here while on Ubuntu LibXml2 can be installed using sudo apt install libxml2-dev.
Python bindings
Optional Python bindings are provided using SWIG.
To compile the bindings, a SWIG installation is required, as well as a Python 2 or Python 3 installation (including the development packages on Linux systems, e.g. python-dev).
Creation of Python bindings can be enabled/disabled at configuration time.
Setting up the codebase
The remainder of this document assumes that the above pre-requisites have been met. It covers setup from the command line. If you are using a GUI like GitHub Desktop then you will need to adjust the commands for the GUI you are using.
The goal here is to get a working copy of source code, tests, and documentation onto your computer so that you can begin development. To make this happen, you will need to fork the prime libCellML repository, make a clone onto your computer, and set up the Git remotes. In Fig. 1, you can see a pictorial representation of what we are aiming to achieve.
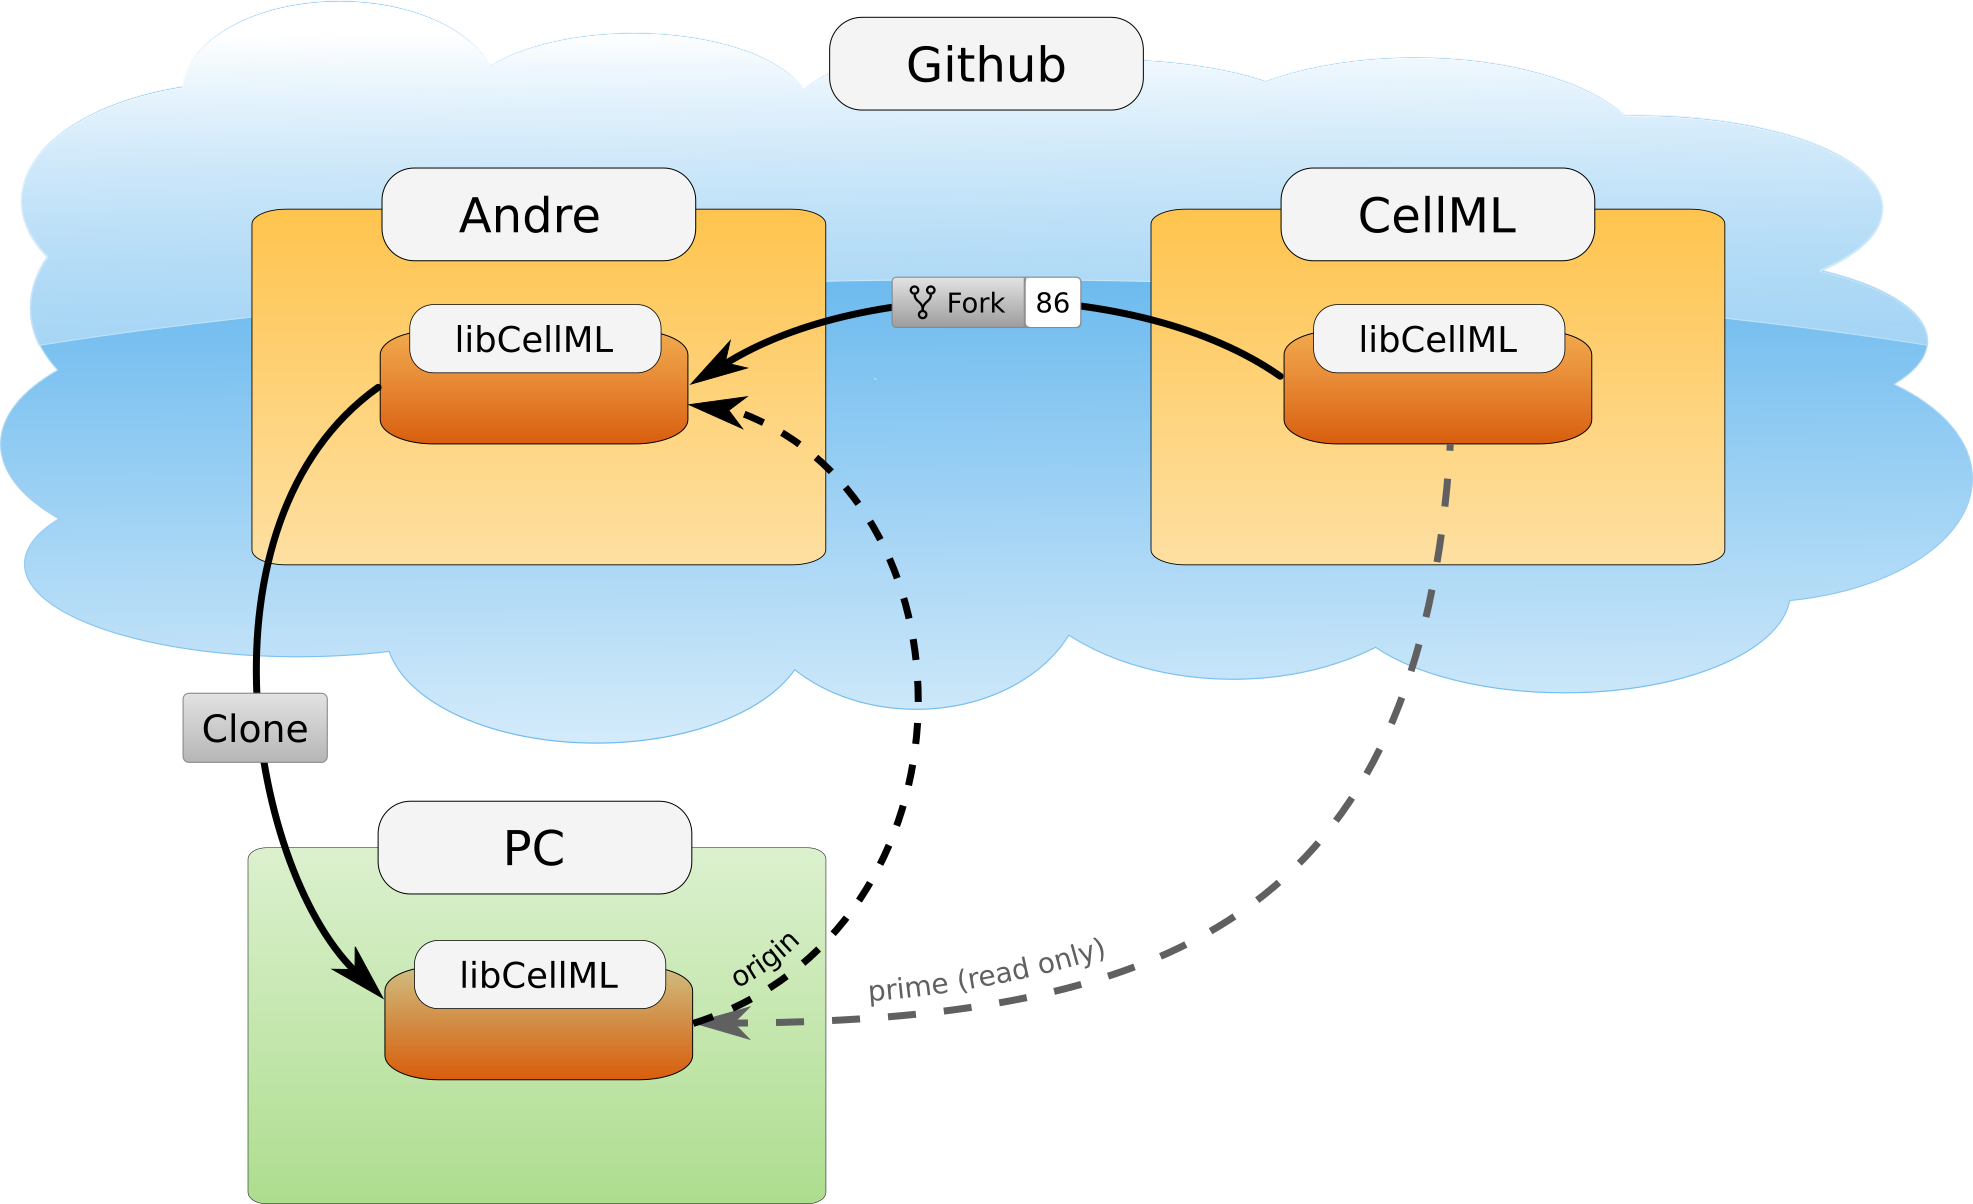
Fig. 1 Setup of repositories for development.
The four steps to getting set up are detailed below.
Forking your own copy
Login to GitHub using your credentials and go to https://github.com/cellml/libcellml.
Use the fork button to create a libcellml repository under your own account, see Fig. 2 for locating this button.
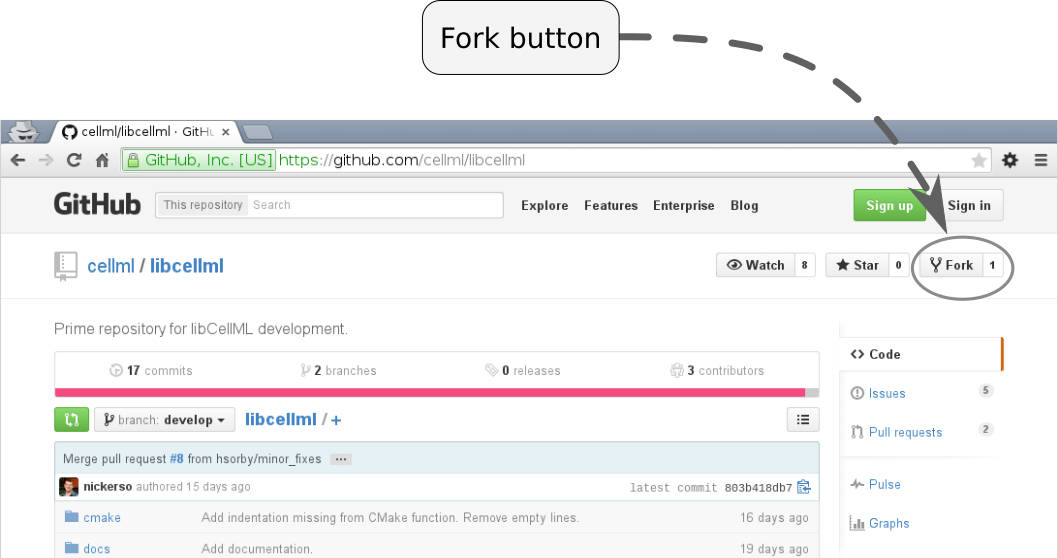
Fig. 2 Fork button for libCellML repository.
Clone
You now need to clone the libCellML repository to your computer. You do this by going to your fork (in this example user andre’s fork) at https://github.com/andre/libcellml.
Warning
Do not try and clone this location substitute your GitHub username for andre. In all likelihood, it does not exist.
On the right hand side of the webpage, on your fork of the repository, you can get the link for cloning the repository to your computer, in our example:
https://github.com/andre/libcellml.git
Now clone the repository:
cd <somewhere/you/keep/development/code>
git clone https://github.com/andre/libcellml.git
Note: again, do not clone this location substitute your GitHub username for andre.
Set Git remotes
You now need to setup a read-only remote connection to the prime libCellML repository. Given that you are still in the directory where you cloned the libCellML repository from, do the following:
cd libcellml
git remote add prime https://github.com/cellml/libcellml.git
git config remote.prime.pushurl "You really did not want to do that!"
You have now added a new remote named prime and set origin as the default fetch and push location to point at repositories under your control on GitHub.
Here, prime is a reference to the main definitive repository where releases are made from for the libCellML project.
You have also set the prime repository as read-only by setting an invalid push URL.
Finally
You are all done and ready to start development, read Building on how to build libCellML. Then, read Contribution to get your changes into libCellML’s prime repository.